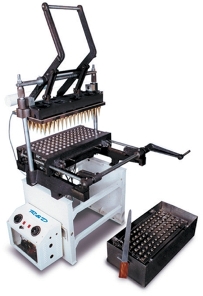
Production Information
Instructions: Operation of the machine "ZE" series
ACCESSORIES:
ERECTION OF THE MACHINE
The machine is delivered in a mounted state. The machine requires a special foundation and can be screwed down on any
desired place after having been adjusted by means of a water level.
Note: proper leveling of foundation is essential
ELECTRICAL EQUIPMENT
PREPARATION FOR THE MACHINE
BAKING - IN
-
Before starting regular baking operation, the
moulds must be well baked out. For this purpose the baking surfaces
are to be greased well, at best with bees` wax or veg. oil. Then the baking procedure can be started with low heat and maintained until the cones can be taken off the mould
easily without breaking or sticking. During the baking period it must be seen to it that the baking surfaces are
greased evenly so that the grease can slowly burn into the fine pores of the molds and cores, thus forming a sort of
glazing.
BAKING:
-
The initial heating of the machine should be made in a close
state. The initial heating time amounts to be about 15 to 20 minutes.
-
The dough prepared by the mixing machine is put into the batter tank. The dosimeter is dipped into the tank, each small cup of the dosimeter contains exactly the same quantity of the dough for each cone.
-
The tilting infusion device is dipped into the dough and hung up on the four halts so that the excess dough can drip down. Behind the dough vessel there is a flap with thread bolts by means of which the dough can be brought in an oblique position together with
the tilting infusion device hung up on the halts. By this a simple regulation of the dough quantity is achieved. Thereby the even position of the dough vessel represents the maximum and the
most oblique position of the vessel the minimum of the dough quantity.
-
The tilting device is led by hand over the surface of the molds . The tilting lever is pulled forward with the the second finger of the right hand (Index
finger). The dough now is poured into the cone molds.The tilting infusing device is taken out
and dipped into the dough vessel to be filled again.
-
Remove the desimeter and lower the upper mould. It is recommended before
you close the die completely to DIP the cones of the upper moulds on the lower
mould without closing it. Lift the cones up by 1" and DIP them again in the
mould. finally close them completely. This is done to get a uniform distribution of batter in the Die cavity of
the cone.
-
Baking time varies from 1 to 2 minutes according to the size of the
cone, quantity of batter, type of water, heating degree, etc.
-
When you have closed the die, a little excess
material (BURR) is forced out of the mould with a hissing sound. In order to obtain water vaporization as well as a perfect distribution (finish) of the product in the mould.
-
After baking time (i.e. 1 to 2 minutes), lift the upper molds but before you open the lower
mould; the baked excess dough is removed from the surface of the molds by means of the cutting knife (delivered along with with the machine).
-
After DEBURRING with the knife, open the lower
moulds, the baked cones fall into the container placed below. Close the lower mould and repeat a new cycle.
CLEANING
Ready made batter goes bad or becomes stale within 2-3 hours. So cleaning of the Batter
tank/Mixer is absolutely essential at frequent intervals.
-
The batter vessel is filled with water and the tilting
device is put into it; to allow it to soak. After a few minutes rinse it with clear
water. The vessel and the tilting infusion
device must be put up for drying.
-
Over a period of time some carbon residue may develop on the Die portion
and the plate surface. It should be cleaned by means of a brass brush.
LUBRICATION
-
Lubrication is essential for the smooth and safe working of
the machine. It also prevents unnecessary "wear and tear" of the machine.
A strict maintenance plan should be followed.
-
The following points should be noted:
1) Cleaning should precede Oiling/Greasing
2) Check the enclosed chart for details.
|


